
They can be connected to any of the I2C channels except the Main I2C Channel. As the address of the Adafruit can be selected by hardware, (2) Adafruit displays can be connected to the same I2C channel by selecting different address in each of them.
Follow this procedure to connect the Adafruit OLED display to the PS Cockpit System:
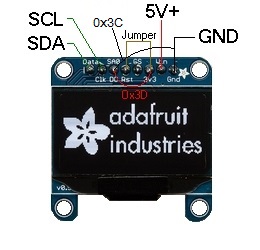
1. Prepare the Adafruit display for I2C operation by soldering the (2) jumpers SJ1 and SJ2 located in the back of the display:

2. Supply power +5V to Vin pin and ground to GND pin.
3. Supply V+ to Reset pin. This can be easily done by wiring the 3.3V pin (output) to the Rst pin.
4. Select the Adafruit address mode by wiring the SA0 input:
- “0x3D” address: SA0 to 3,3V or 5V
- “0x3C” address: SA0 to GND
14/01/19 =========================================================
Some displays refuse working with address 0x3D. Tie SA0 to GND and use 0x3C address
Power the display OFF and power ON again, then config display.
================================================================
5. Connect the desire I2C channel of the PS Cockpit System to Data and Clock pins. It can be done from one of the expanders of the I2C channels.
Now that the Adafruit display is connected and powered you can run the PS Cockpit Software to configure it for the desired function by clicking on the Adafruit icon at the left of the Main Page.
3. Supply V+ to Reset pin. This can be easily done by wiring the 3.3V pin (output) to the Rst pin.
4. Select the Adafruit address mode by wiring the SA0 input:
- “0x3D” address: SA0 to 3,3V or 5V
- “0x3C” address: SA0 to GND
14/01/19 =========================================================
Some displays refuse working with address 0x3D. Tie SA0 to GND and use 0x3C address
Power the display OFF and power ON again, then config display.
================================================================
5. Connect the desire I2C channel of the PS Cockpit System to Data and Clock pins. It can be done from one of the expanders of the I2C channels.
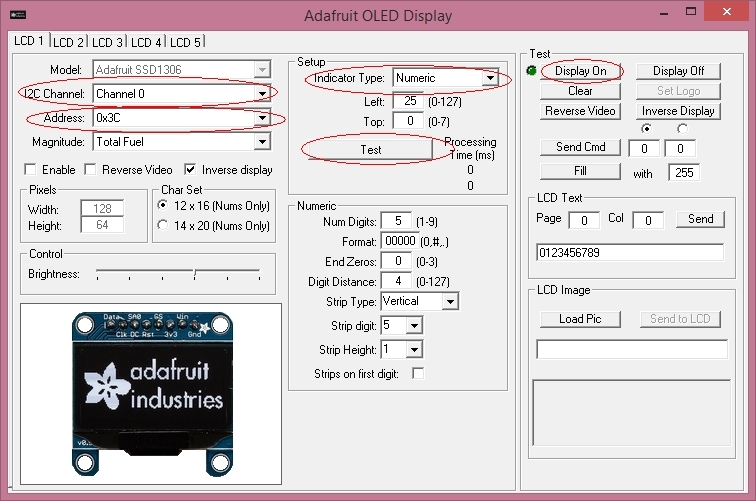
To configure the display follow the next procedure:
1. Select the I2C channel where the display is connencted.
2. Select the display address.
3. Select the Indicator Type in the Setup Frame
4. Click on “Display On”
5. Click on Test
Indicator type
You can choose the function of the display by selecting one of the following types in the pull down menu: Numeric, Digital Watch, Tacan Channel, ILS Frequency, Picture or Level Strip.
Depending on the type selected some other related configurable parameters will appear.
For Numeric, Digital Watch, Tacan Channel, ILS Frequency types, you can adjust the following parameters:
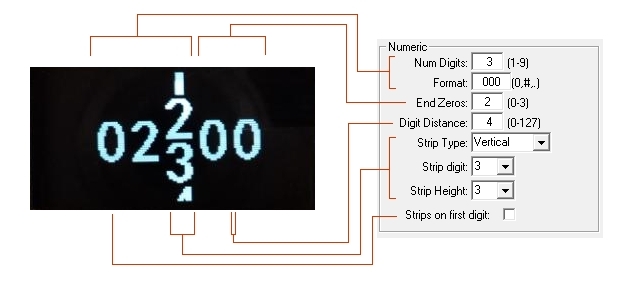
For Picture type you can adjust the following parameters:
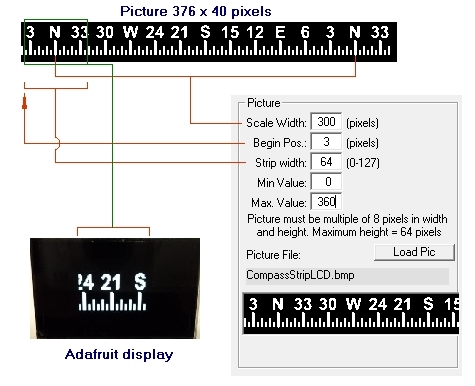
The magnitude of the sim has to be selected in the pull down menu “Magnitude”
See some exmaples here
Regards,
Shep
The magnitude of the sim has to be selected in the pull down menu “Magnitude”
See some exmaples here
Regards,
Shep
No comments:
Post a Comment